| Mastering VB Controls |
| Written by Mike James | |||||
Page 3 of 4
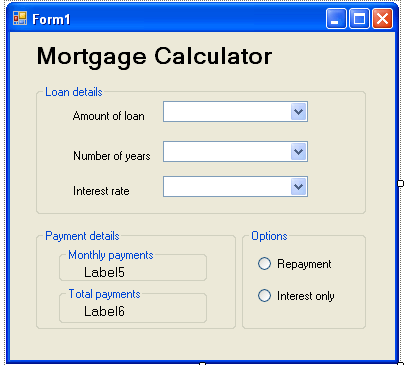
Mortgage Calculator revisitedIn Chapter Two we looked at how a form could be created to calculate mortgage repayments. The form used simple text boxes as input and contained no elements of user choice. Now that we know all about CheckBoxes, RadioButtons, ListBoxes and ComboBoxes it is possible to do a much better job. You might be surprised however at how much work has to go into creating a good user interface. It is often said that the user interface consumes as much as 90% of the effort in building a program. First we need to design the form. This is fairly simple but notice that GroupBoxes are used to group not only RadioButtons together but controls on three basic areas of the form. Using GroupBoxes in this way makes it easier to re-arrange the form and it provides easy to use labels for groups of controls. In addition we also use the Label controls to provide captions and output area. GroupBox1, captioned Loan details, contains three ComboBoxes - combo1,combo2 and combo3 - which have also been labelled. GroupBox2, captioned Payment details, contains two more GroupBoxes - GroupBox4 and GroupBox5. GroupBox4 contains Label5 and GroupBox5 contains Label6. It is important that these two label controls are named Label5 and Label6.
GroupBox3 captioned Options, contains two RadioButtons Option1 and Option2. The buttons are captioned Repayment and Interest Only.
 Now that we have the form layout we need to write some code that will initialise the ComboBox item lists and calculate the result. The initialisation is best done by the Load event of Form1. This is, as its name suggests an event that is triggered when the form is first loaded and it is a good place to write instructions that initialize things. If you double click on the form while you are in the designer then you will automatically be taken to the code editor with an event handler for the form load event ready for you to work with. Private Sub Form1_Load( ComboBox1.Items.Add("20,000")
ComboBox2.Items.Add("5")
ComboBox3.Items.Add("6")
ComboBox1.SelectedIndex = 1 You can, of course, set the ComboBox lists to anything you like. Notice the selection of RadioButton1 as the default selection in the last but one line. You could have set all of these properties using the Properties window and saved yourself the typing of hte code. In general you often have a choice of setting a property using the Property window or via some code. In most cases it is less work to use the Property window. Next the calculation routine. Rather than link this to any particular event handler it is better to create a separate subroutine that does the calculation and try to work out later exactly when it should be used. We will meet subroutines later in the series - for the moment just think of it as an event handler that isn't associated with an event! The code for Calculate is a bit long but not difficult. The best way to understand this subroutine is to look at it in sections and there are both some new ideas and some new instructions introduced in this example. All of the ideas will be explained in detail in later chapters but for now just follow the general ideas. The first three lines make sure that the ComboBoxes have numeric values in them and not any old text such as "none" or "forever" etc. The IF statement works much as you would imagine it to from its normal meaning. The IsNumeric function simply tests to see if an object is numeric or not and the Exit Sub statement brings the subroutine to an end. So the first line means "stop the subroutine if ComboBox1 contains something that isn't a number". Sub Calculate() Now that we know that the ComboBoxes contain valid data, i.e. numbers, we can begin to process it. |
