| Getting Started With NetBeans PHP - Local Projects |
| Written by Alex Armstrong | |||
| Tuesday, 18 August 2015 | |||
Page 1 of 2 NetBeans is primarily a Java IDE, but it also is a really good way to work with PHP and general HTML/JavaScript projects. The big problem is that the documentation isn't very good. Find out here how to get started with a local project, including debugging, without having to install a LAMP stack.
NetBeans is an open source IDE written in Java and originally intended to support Java development. Today it supports PHP, C/C++ and HTML/JavaScript development. Its PHP support is currently so good that it is a very sensible choice for many programmers and it is particularly sensible if you want an IDE to get started on learning PHP or with a new project. It is also a good choice if you have been using Eclipse as your development environment for PHP. Support for PHP in Eclipse has been patchy over the past few years, although there are signs that it is getting more support in the current version. If you are looking for an alternative IDE then NetBeans is sometimes described as "Eclipse done better". The problem, however, is that the documentation on how to set it up is a bit behind the times. The program may advance, but the documentation stays in the same place. In this article we look at the basics of setting up NetBeans for PHP development with HTML and JavaScript using the built-in PHP server and look at ways of configuring the system to allow easy debugging. A future article will be on the same topic using a LAMP stack both locally and remotely. Get NetBeansThe process of installing NetBeans is very easy. Go to the website and just do it. You need to pick the version of NetBeans you want and the one for PHP development is listed as HTML5 & PHP. This still includes many features that you might never use but at 63MBytes it isn't worth worrying too much. You can also install the entire NetBeans suite and have Java and C++ support as well. It is also possible to add features that you have left out and optional modules, but for the moment it will be assumed that you have downloaded and installed the HTML5 & PHP version. You will need to have Java JDK 7 or later installed to run NetBeans but the installer will prompt you to do so if it is missing. The big problem with the HTML5 & PHP version is that it doesn't install PHP. So you can't start creating a PHP project as soon as you have NetBeans installed. The solution is to go to the PHP website and download the latest non-thread safe x86 version if you are working with Windows. This has to be PHP 5.4 at least. I used PHP 5.6.12 VC11 Non Thread Safe. If you are using any of the standard Linux distribution then simply use the package manager - assuming PHP isn't already installed. For example, for Ubuntu:
Windows installation simply requires that you un-zip the download into a suitable directory - usually C:/php5. Important Note:If you find that you follow these instructions but nothing works then go to the command prompt and move to the directory that you have php installed in i.e. cd c:/php5 say. Next type php and look for an error message. If you are using Windows 10 you will probably see and error about a missing VCRUNTIME140.dll. If you do see this then simples option is to download and installing vc_redist.x86.exe. It is a good idea to install both the 32 and 64 bit versions.
Hello PHP WorldRun NetBeans and select File,New Project. Select PHP and PHP Application in the dialog box that appears. The other options will be explored in the next article.
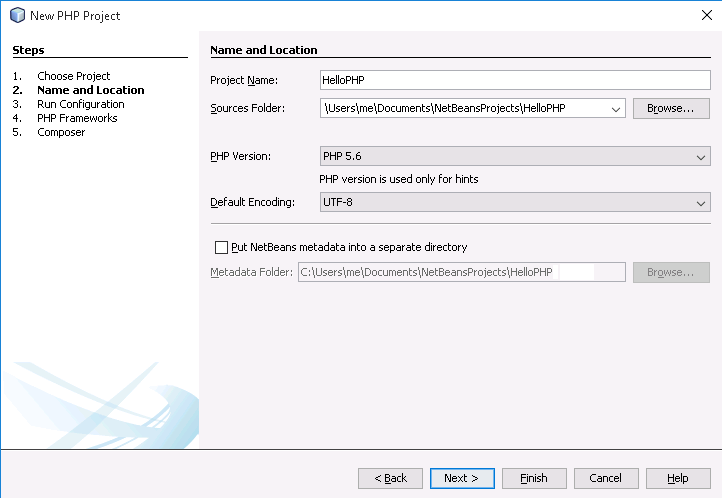
From here all you have to do is give the project a name:
At the next step you have to define how you want your website run. If you have a local or a remote Apache or other web server then you can select one of these options. If you are just getting started with PHP or with a project you can select PHP Built-in Web Server (running on built-in web server) You can leave the other options at their defaults. The run configuration can be changed later.
After this you can select Finish and NetBeans will generate the project for you, complete with an index.php file. For the sake of tradition change this to read:
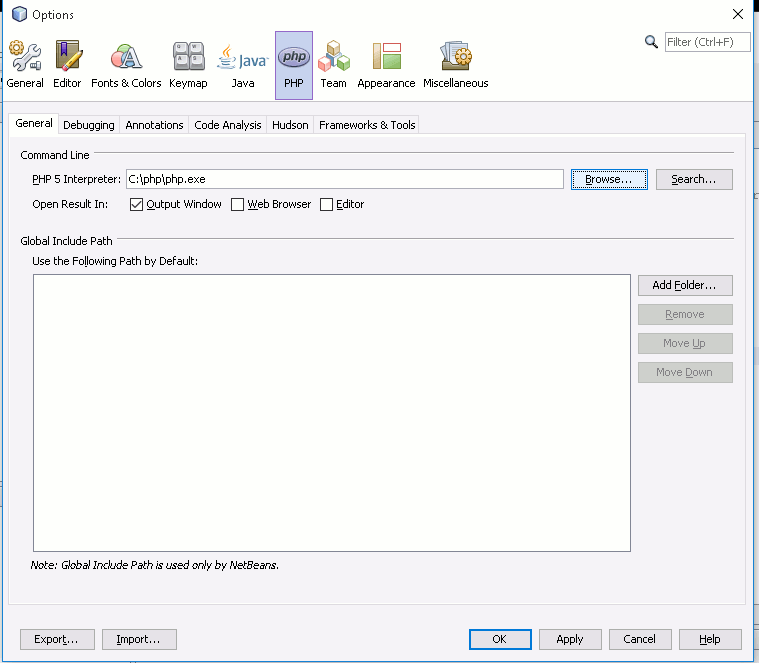
Next right click and select Run File. You will see a dialog box "PHP interpreter must be selected". This is reasonable as you know you have installed PHP, but NetBeans doesn't. If you click OK the options dialog box appears. You can get to the options dialog box any time you need to via the tools menus - Tools,Options. All you have to do is click Browse and navigate to the location of the PHP interpreter, C:\php\php.exe, say:
As long as you have supplied the correct location for php.exe you can now run your program. You should see a web page appear with Hello World. If you don't then you will have to select one of the web browser options that are offered in the Run, Set Project Browser options. If you can be bothered to install the NetBeans connector for Chrome, this offers some additional debugging facilities:
In fact the first of these is worth the effort because without it every time you run the application a new browser window opens. The only downside of using the Chrome NetBeans connector is that it occasionally doesn't work and you have to fall back to a simpler browser setup. Notice that the NetBeans connector gives you JavaScript debugging, but what about PHP debugging? |
|||
| Last Updated ( Tuesday, 25 April 2017 ) |


