| Getting started with PhoneGap |
| Written by Harry Fairhead | ||||
| Tuesday, 13 September 2011 | ||||
Page 2 of 3
Testing Eclipse and the addonYou could now move on to install the PhoneGap SDK but it is worth making sure that Eclipse and the plugin are working well together. The easiest way of doing this is to create and run a default Android project - you don't need to do any coding or understand how it works. First we need to setup an Android emulator. Start Eclipse and select Window->Android SDK and AVD Manager. Select Virtual devices and click New. You can now select the characteristics of the emulator you want to use. At this stage it doesn't really matter what sort of emulator you create - give it a suitable name, target Andoid 2.2 (say), a Skin and then click Create AVD. You can edit the emulator setup at any time in the future. Before leaving the SDK and AVD manager it is worth checking that the emulator will run. Select the emulator you just created and click the Start button. It usually takes a while for the emulator to get started - it goes though the entire Android boot sequence. Leave it running so that the default Android application can use it. Next return to Eclipse and use the command New->Project->Android->Android Project. Call the project MyProject, or whatever you like, and select Android 2.2 as a target and use the package name com.example.helloandroid. When you click Finish the project will be created in the workspace. Now select the project in the Package Explorer to the left and right click on it. Select Run As, Android application. If the emulator is still open you should see "Hello World, Hello Activity" appear - if the emulator isn't already running then you will have to wait while it boots. If there are any problems my only advice is to read the error messages and try and work out what is not setup correctly. There isn't much point in moving on to PhoneGap if you can't run a simple Android application first. 5. Download and install PhoneGapThe previous steps may seem like a long and complicated process, but if you already had an Android development environment set up and working you could have started from this point and skipped the preliminaries. Equally you could have avoided all of this by uploading your HTML app to the Build service and downloading the resulting native app. Next download the PhoneGap SDK. This is a single zip file containing the code you need to work with any of the supported phones (at the moment the Windows Phone 7 code isn't included). There are three files essential files but these are needed within each PhoneGap Android project you create and so copying them from the zip isn't a one-time operation. The files you need are:
6 Creating a PhoneGap projectThere is another small problem in that PhoneGap doesn't provide a template to create a PhoneGap project within Eclipse. What the documentation suggests is that you create a standard Android project and then manually customize it to become a PhoneGap project. This approach is messy and error prone. A much simpler solution is to install the sample project that comes in the SDK and then customize it. This is simpler because the project has all of the files installed and it acts as a template for your project. In addition you can use it to check that everything is actually working. All you have to do to is open the PhoneGap.zip and drag the folder Android/Sample to an accessible location such as MyDocuments - don't, however, drag it to the Eclipse workspace. Next start Eclipse running and use the command File->New->Android Project. In the dialog box that appears, enter Sample for the project name, select Create project from existing source and then navigate to the Sample directory you extracted from the zip. Select the Android 2.2. target and click Finish - the other details should be filled in for you.
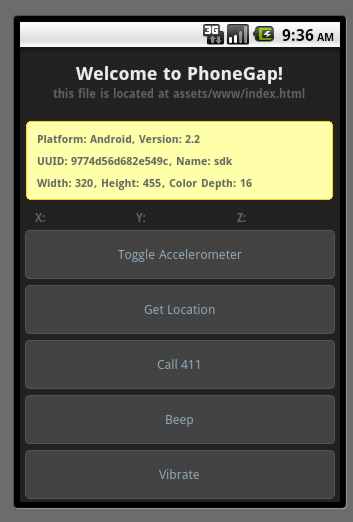
When you click Finish the project is generated for you. You will almost certainly see some error messages. This is because the PhoneGap JAR file isn't in the build path. Navigate to Referenced Libraries, right click on phonegap-1.0.0.jar (or whatever version is current) and select: Build Path->Add to Build Path After a moment or two the error should vanish from the source files. Next select the project Sample, right click and select Run As -> Android application If the Android emulator is running you should see the app open more or less at once. If it isn't then you will have to wait while it boots up.
|
||||
| Last Updated ( Tuesday, 13 September 2011 ) |