| Getting started with MIT App Inventor |
| Written by Mike James | |||||
| Monday, 12 November 2012 | |||||
Page 2 of 4
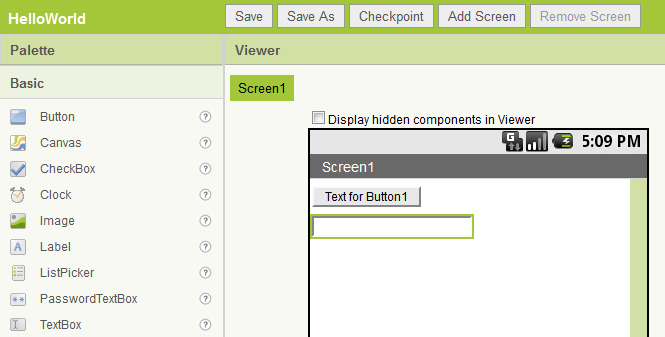
First button and textboxTo get started all we need to do is place a button and a TextBox on the Viewer. To do this simply make sure that the Basic tab is selected, click and hold on the button icon and drag it to the viewer and release the button. If this doesn't seem to work for you give the web page a moment or two - it can be slow to respond. Repeat the drag-and-drop for the Textbox.
The components will arrange themselves on the screen. There are ways that you can control the layout but for the moment let's concentrate on getting the example working. If you select the Button object in the viewer and look at the Properties panel you will see lots of settings that effect the way the Button looks. To change any of these simply type or select a new value. In this case all we need to do is change the Button's text. Scroll down until you find the Text property and enter into the box below - Click Me.
When you return to the Viewer you will find that the Button now says "Click Me" - if it doesn't you haven't left the Text entry box. Either press return or click another area of the page. This completes our very minimal UI! In a real application you would spend much longer creating a suitable UI including uploading graphics and sound files to use with it. You will also go through many iterations of creating and tweaking the UI as you gain experience from using the app for real. The Blocks EditorWhile the Designer is the place that you app gets its look the Blocks Editor is the place your app gets its functionality. This is the place where you "write" the program. The first problem with using the Blocks Editor is that it runs as a desktop app but it needs a download each time you run it. When you click on the "Open the Blocks Editor" button a Java download is initiated. You may well discover that your browse or operating system pops up messages saying its dangerous to download programs and other similar warnings. Ignore them all and when given any choices make sure you select Open or Run rather than Save. The download has to execute for you to see the Blocks Editor. Eventually is should open and you should see something like:
The Blocks Editor can look a bit mystifying when you first encounter it. All I can say is that once you understand its very simple operating principles and how it is organized it very quickly beings to look simple. Each block represents some part of a program that you can use to put together a complete program. The Blocks palette has three tabs - Built-In, My Blocks and Advanced. Although Built-In has lots of interesting things you will want to use it's My Blocks that holds the blocks that are specific to the UI you created using the Designer and this is usually where you want to start work. If you select the My Blocks tab you will see each of the components you added in the Designer plus the Screen which is a default object added to the Designer when it starts.
<ASIN:1934356565> <ASIN:047077018X> <ASIN:0321743016> <ASIN:1449383262> |
|||||
| Last Updated ( Monday, 12 November 2012 ) |