| Getting started with Microsoft Kinect SDK - The Full Skeleton |
| Written by Mike James | ||||
| Monday, 23 January 2012 | ||||
Page 2 of 3
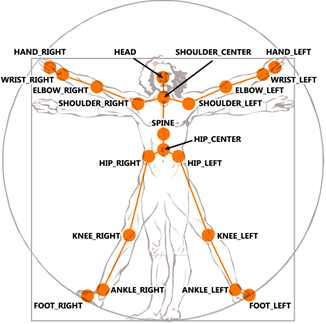
Now to display the image we simply need to write the code for the FrameReady event handler. However we are going to want to modify the video returned from the camera by adding a small cross at the position of the players head. To do this we will store the video frame in a global variable and allow the SkeletonFrameReady event handler to actually do the displaying of the video frame. So the FrameReady method is: void FrameReady(object sender, The videoimage variable is just a global PlanarImage: PlanarImage videoimage; Now we need to define the SkeletonFrameReady event handler to simply show the video. It has to check first to make sure that an image has been stored in the videoimage: void SkeletonFrameReady(object sender, We can't display a PlanarImage in, say, a PictureBox unless we first convert it to an Image object. How to do this was covered in Part 1 of this series, so the method that does the job PImageToBitmap is simply quoted: Bitmap PImageToBitmap(PlanarImage PImage) For an explanation of how this works see Part 1 - but essentially what it does it take a PlanarImage and returns an equivalent Bitmap object. Drawing the BodyNow that we have the video frame as a bitmap we can start to draw the skeleton on it. First we need a Graphics object: Graphics g = Graphics.FromImage(bmap); Our next problem is to find the positions of each of the joints that makeup the "body" of the skeleton. If you look at the diagram that gives the names of the joints you can see that we need the positions of the Head, Shoulder Center, Spine and Hip Center.
The positions of these four joints gives us the line of the torso. First we need the head: Vector location = and we need to convert its position to pixel co-ordinates as described in the previous article: float xd, yd; So far so good but now we need the position of the ShoulderCenter joint and this means repeating everything we have just done. We clearly need to package this code into a helper method: Point GetJoint(JointID j, The only difference is that we are now returning the co-ordinates as a Point object. Now we have the helper we can plot the line between the head and the ShoulerCenter joints: Point p1=GetJoint(JointID.Head,data); Now if you run the program you would see a single red line drawn from the head to the shoulder. This is the first part of our skeleton drawing. |
||||
| Last Updated ( Monday, 06 February 2012 ) |