| Getting started with Microsoft Kinect SDK - Player index |
| Written by Mike James | |||
| Tuesday, 26 July 2011 | |||
Page 1 of 2 Kinect provides two levels of processed data - a skeleton map which gives you the position of the player's limbs and a user index which can be used to discover the player's overall position. In this article we take a close look at the player index data. UPDATE: A new version of the entire series for SDK 1.0 is being prepared and should be published soon.
The first part is Getting started with Windows Kinect SDK 1.0 If you don't want to miss it subscribe to the RSS feed, follow us on Google+, Twitter, Linkedin or Facebook or sign up for our weekly newsletter. Other Articles in this Series
This is the third installment of a series on getting started with the Kinect SDK. In Part 1 we covered the initial steps of how to power your Kinect, downloading and installing the SDK, and using the video camera, Part 2 we looked working with the raw depth data in this part we work with some processed data - the player index. Kinect has two types of raw output - standard color video and the depth field which tells you how far away each pixel is. In th main it is the depth field which is the exciting part of the Kinect and as well as raw data the Kinect makes available two processed data streams derived from the depth data. The first is the user index and the second is the skeletonization data. Although the skeleton data is perhaps the most impressive the user index is often more useful. While the skeleton data will give you the position of various parts of the body the user index gives you, after a little processing, the area of the view that each user is currently ocupying. This can be used as a general location finder or it can be used as a mask to process the video image. The Kinect is very clever and processes the depth data to locate human body like objects. It does this not so much by recognizing a whole human body but by recognizing limbs and placing the joints to build up a skeleton. As already explained this skeleton provides a lot of information but the Kinect also makes use of it to detect the whole user and it labels each pixel with a number from 1 to 7 to indicate that it is part of user 1, 2, and so on up to 7. If a pixel isn't part of the image of a user then it is assigned index zero. So far the theory is interesting and you should be able to see what you can use the user index data for so let's get started. As with most Kinect tasks most of the effort goes into moving the data about and getting it into the correct format to be usable. In the previous article, Getting started with Microsoft Kinect SDK, we covered how to power your Kinect, downloading and installing the SKK, and using the video camera. In the second article Getting started with Microsoft Kinect SDK - Depth we covered how to read the raw depth data and how to display it. If you don't know how to setup or the basic processes of getting data from the Kinect you need to read these two article first. In this article it is assumed you know how to get started. To work with the user index data you need to set the Kinect up to perform the skeletonization procedure as well as returning raw depth information. The user index is derived from the skeleton data so you can't have it without turning on the skeleton data. The program starts off in the usual way with the creation of a Runtime object: nui = Runtime.Kinects[0]; Next you have to initialize it to user the depth camera and to use SkeletalTracking and depth and player index: nui.Initialize( You can also turn on the video camera but it isn't going to be used in this simple example. Now we need to open a DepthStream and define an interrupt handler that will be called when a frame of data is ready: nui.DepthStream.Open( From this point all of the work is done in the event handler. void nui_DepthFrameReady( The event argument e has a ImageFrame.Frame property that provides a PlanarImage data structure containing not just the depth data as in the previous article but the raw depth data packed with an index that indicates which user the pixel belongs to. The packing is fairly simple. If you consider each pixel to correspond to a 16 bit number then the low order 3 bits give the user index i.e. a value between 0 and 7. The depth data is packed into two bytes as before but shifted right by 3 bits to accommodate the index bit field. Separating the two pieces of information is fairly easy. You can use a logical mask to extract the lower three bits and then use shifts to assemble the depth data in the usual format.That is if b1 is the lower byte and b2 the high byte user index = b1 & 0x07; and depth = b2<<5 | b1 >>3; If you don't follow the last expression you need to remember that b1 contains eight bits and the bottom three bits are removed by shifting right three times. This leaves five depth data bits in b1. The eight bits in b2 have to be shifted left by five bits to be in the correct position to assemble the two bit patterns into a 32 bit Int. It also helps to remember that all logical operations and shifts are performed after converting to int. Putting this together we can now start to process the Planarimage object into something more usable. As a first step let's separate the data into two arrays: int[] depth = we need to scan through the byte array two bytes at a time: for (int i = 0; i < depth.Length; i++) Displaying the data - Windows FormsNow we have the player data and the depth data in int arrays. These can be converted into Bitmap objects in the usual way. The depth data can be used as described in the previous article and the only change is that now it is in an int array. To convert an int array to a Bitmap the basic scheme is the same only now you use a different overload of the Copy method Bitmap IntToBitmap(int[] array, If you place a PictureBox on the form you can view the depth data using pictureBox1.Image = IntToBitmap(
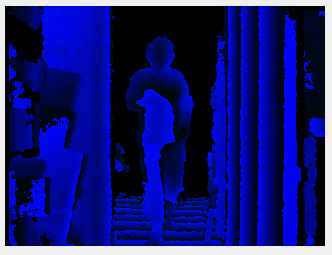
Notice that this isn't a good mapping of depth number to color because only the lower 13 bits are used by the depth measurement and these are mapped to green and blue - red isn't used.
|
|||
| Last Updated ( Monday, 06 February 2012 ) |