|
Page 1 of 5 ListView is probably the most commonly used and needed UI components in an Android app. It isn't difficult to use, but you need to get to grips with the idea of an "adapter" and understanding what is going on pays dividends.

Starting With an App
Third Edition
Is now available in paperback and ebook.
Available from Amazon.
- Getting Started With Android Studio 3
- The Activity And The UI
- Building The UI and a Calculator App
- Android Events
Extract: Using Lambdas
- Basic Controls
- Layout Containers
- The ConstraintLayout
Extract: Guidelines and Barriers
- UI Graphics A Deep Dive
Extract: Programming the UI ***NEW
- Menus & The Action Bar
- Menus, Context & Popup
- Resources
- Beginning Bitmap Graphics
Extract: Simple Animation
- Staying Alive! Lifecycle & State
- Spinners
- Pickers
- ListView And Adapters
If you are interested in creating custom template also see:
Custom Projects In Android Studio
For a range of reasons, one of the most common things you need to do in an Android UI is to display a list of things that the user can select from. We have already looked at the basic Picker in chapter 12 but the ListView is a more general category of "picker".
If you are familiar with desktop development then you probably think of lists that the user can select from as being similar to a drop-down list. Android and portable devices often need something more than just a small list. Because of the limited screen size it is often the case that the user can only be shown an overview of quite a few different items. When the user selects an item they are then presented with more details of the item - a details view.
Displaying lists and other collections of data is so common that Android has a mechanism that makes it easier.
Well it does make it easier once you understand how it all works.
The key idea is that to display a collection each item in the collection has some how to be converted to an appropriate View object. It is the View object that the container displays for each item of data in the collection.
The Adapter
Displaying a collection of items has a number of similarities no matter what the collection of items are or what container is used.
The container has various positions that are visible on the screen for displaying items. For example, a ListView has horizontal slots, one per item and a GridView has a 2D grid of slots.
Each container accepts a View object and displays it in a slot.
For example, you could provide the ListView with TextView objects and it would simply display text in each of its slots.
You might be wondering why not just supply a set of Strings to the ListView and let it work out how to display the Strings as text?
Things could be organized in this way and it would be simpler - but only if you wanted to display Strings.
If you wanted to display a list of images, say, then you would need a ListView that understood images and so on.
It is much more flexible to provide the container with a set of preprepared View objects because then the container simply has to display the View object without having to perform any conversions.
All containers that derive from the AdapterView class make use of adapters to supply what they display in terms of View objects. These include, as well as the ListView and GridView, the Spinner, Gallery and StackView.
We have already looked at the use of the Spinner and its associated adapter in an earlier chapter so this time it is the turn of a more advanced UI element - the ListView and its adapter.
This approach also has the advantage that you can provide the container with a View object that is a complete layout i.e. it could itself be a container with lots of View objects to display. For example, you could supply a ListView with a View object that contains an image and a TextView to create a multimedia list of pictures and text.
Of course if the container isn't doing the conversion from the data object to the View object - you are going to have to do it.
This is where the Adapter comes in.
The ListView and the GridView containers both make use of the ListAdapter class as their basic Adapter.
In general you have to take the ListAdapter class and extend it to create your own custom Adapter which generates a custom View object for the container to use in each of its slots. The container asks for the View object to be used to display item i or using whatever indexing suits the particular container. The Adapter returns the View object and the container displays it - without worrying what it is or what it corresponds to.
This might sound complicated but it turns out to be very simple in practice.
However to make things even simpler there is also an ArrayAdapter which lets you display a single text item for each element of an array of arbitrary objects.
How can this possibly work if the object in the array can be anything?
The first thing to point out is that ArrayAdapter is a generic class and can accept an array of any type as long as you specify it when you create the ArrayAdapter instance.
The second thing to point out is that Array adapter calls each items toString method to get some text to display in the container - very simple but also very restrictive. In fact it is quite easy to modify what the ArrayAdapter displays and this makes it more versatile than you might expect and hence well worth getting to know.
So to summarise:
- Containers like ListView and GridView display View objects in a particular arrangement - as a vertical list or as a 2D grid in this case.
- An Adapter converts the data that is to be displayed in each slot into a suitable View object.
- For complex data and displays you need to create a custom Adapter.
- In many cases however the ArrayAdapter can be used. That is ArrayAdapter is a predefined custom Adapter for converting Arrays to TextView objects.
- The ArrayAdapter, at its most basic, can supply TextView objects to a container from an array of any type simply by calling the object's toString methods.
The ArrayAdapter
Rather then starting with an example that is completely general it is worth looking at how the ArrayAdapter is used in conjunction with a ListView.
Start a new Android Studio project called ListViewExample based on a Blank Activity and accept all of the defaults.
For a simple example all we are going to do is display a list of names in a ListView.
First delete the usual "Hello World" textView.In the designer scroll down the Palette until you can see the Contaners and place a ListView on the design surface. At the moment the listView isn't automatically assigned an id. If this is the case type listView into the id in the Properties window. If you do this then a dummy content will be generated for you.
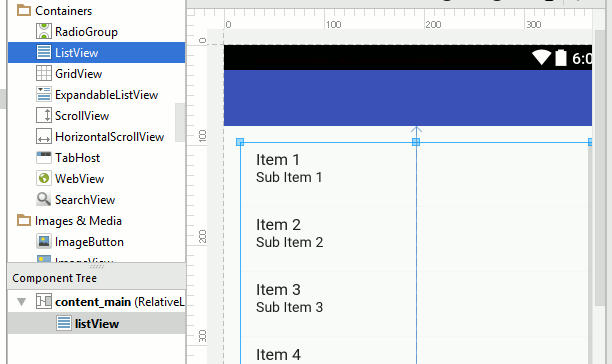
You will see that for the sake of allowing you to work with the layout the designer show you the ListView filled with some two item text objects.
Our Adapter is going to be simpler than this dummy display with just a single line of text.
If you run the program at this early stage you wont see anything in the ListView - it will be blank. The text that you see in the designer is just to help you visualize the UI - there is no Adapter associated with the ListView and hence when you run it there is nothing to display.
Our next task is to create an ArrayAdapter object to supply the ListView with something to display.
But first we need a String array to hold the text we are going to display. For simplicity we might as well add the code to the onCreate method in MyActivity.java. To create a simple String array we can use a literal:
String[] myStringArray={"A","B","C"};
feel free to think up something more creative than A, B, C. In the real world the Strings would probably be read from a file or a database, etc.
Next we need to create the ArrayAdapter. To do this the constructor need the context, usually this, a layout to use to display each String and the String array:
ArrayAdapter<String> myAdapter=new
 ArrayAdapter<String>(
   this,
   android.R.layout.simple_list_item_1,
   myStringArray);
Notice the way that the type of the array is specified as <String>. If you are not familiar with Java generics then you need to look up how it all works. Also notice the use of the standard supplied layout simple_list_item1. You can create your own layouts and we will see how this is done in a moment.
Finally we need to associate the adapter with the ListView:
ListView myList=
         (ListView) findViewById(R.id.listView);
 myList.setAdapter(myAdapter);
The complete onCreate method is:
protected void onCreate(
                    Bundle savedInstanceState){
 super.onCreate(savedInstanceState);
 setContentView(R.layout.activity_main);
 String[]  myStringArray={"A","B","C"};
 ArrayAdapter<String> myAdapter=new
   ArrayAdapter<String>(
        this,
        android.R.layout.simple_list_item_1,
        myStringArray);
 ListView myList=(ListView)
                findViewById(R.id.listView);
 myList.setAdapter(myAdapter);
}
You will also have to remember to add import statements for each of the classes used - ListView and ArrayAdapter - remember Alt-Enter.
If you now run the program you will see a neat list with each array element displayed on a line - as promised.
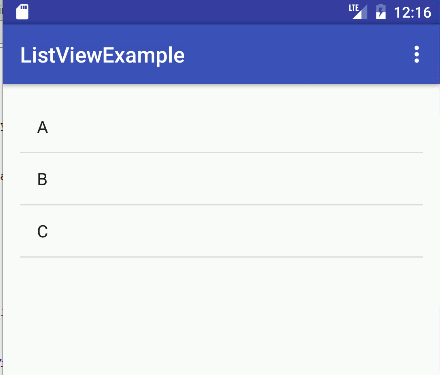
So far this doesn't look impressive but the ListView gives you some basic facilities. For example if you increase the number of elements in the array:
String[] myStringArray=
   {"A","B","C","D","E","F","G","H","I","J","K"};
You will discover that you can automatically scroll through the list using the usual flick gesture.
|