| Android Adventures - Custom Dialogs Using DialogFragment |
| Written by Mike James | |||||
| Thursday, 19 June 2014 | |||||
Page 2 of 4
The Dialog Inside The FragmentYou might be wondering where the window that the DialogFragment displays its UI in comes from? This is more than an academic question because it is the key to understanding the deeper workings and how you can make use of the DialogFragment. The answer is that the window is created by a Dialog class. Before Fragments were invented you would create a dialog by instantiating the Dialog class, or more often one of its child classes and workiing with it and its window directly. That is the DialogFragment creates and instance of the Dialog class and renders its UI, as generated in its onCreateView, to it when you use the show method. The Dialog is created by the default onCreateDialog event handler which is called before the OnCreateView. Why is this important? There are two reasons. The first is that you can retrieve the Dialog object using getDialog and customize it. The second is that you can override the OnCreateDialog to create a custom Dialog of your own - more of this in the next chapter where we look the more common way that dialogs tend to be implemented in Android. Before you skip to the next chapter however it is worth pointing out that using just the DialogFragment, the approach described in this chapter, has a lot going for it and it is simple. For example to customize the Dialog you can use getDialog and say setTitle to make the dialog look more like a dialog:
You can put these two lines anywhere in the OnCreateView method. Now when you run the program you will see that the dialog has a title just like a system dialog.
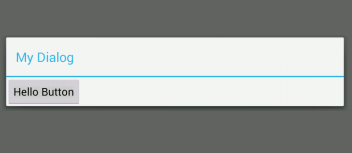
Notice that in using the Dialog object we have made it impossible to use the DialogFragment as a standard Fragment. Now we can only use the show method to show a modal dialog and cannot embed the UI in the app using the FragmentManager. The reason is that if you don't create the UI by calling show the OnCreateDialog isn't fired and hence there is no Dialog object. The solution, is of course, to test to see if there is a Dialog object before using it then you can use the DialogFragment either in a Dialog object or in the Activity. An Example Custom DialogAt this point you actually know enough to implement any dialog you care to try your hand at. It is worth saying, once again, that this approach isn't the one that most Android programmers use. The reason for this is partly the need to stay compatible with the past and partly because it is just the way things have always been done. The important point is that if you want to create any custom dialog you already have the tools to do the job. Let's see how this works with a simple example. The task is to create a dialog that has a cancel and an ok button, display it and communicate the result back to the Activity. Creating the UI is just a matter of using the designer to drop some buttons on the surface. We also need to assign some styles to make it look like a dialog box. Communicating the result of any dialog box operation follow the same general steps. First you have to respond to the user clicking or otherwise interacting with the dialog box's UI. This is just a matter of creating event handlers within the DialogFragment and is nothing new and isn't difficult. The key difference is that any UI interaction that should dismiss the dialog box - i.e. in this case selecting the OK or the Cancel button - actually calls the dismiss method in the event handler. How to let the Activity know what happened? This is just the standard problem of allowing the Fragment to communicate with the Activity and we solved that problem in Chapter 11 by using an interface that the Activity had to implement to use the Fragment. A DialogFragment is no different from any other Fragment in this respect and so an interface is needed. If you don't follow how this works go back to Chapter 11 and read the full story. If you do think you follow then this is another good example of using the Fragment interface pattern. Now we have a plan lets put it into action. First we need a DialogFragment and an XML layout for it to use. Creating the XML layout is just a matter of right clicking in the layout folder and selecting New, Resource Layout. Call the layout mydialog or what ever you like as long as you make the change consistently. Used the layout designer to create something that looks like the picture below:
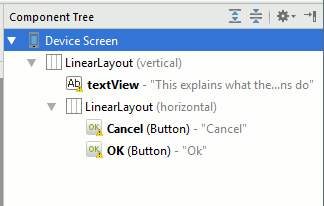
This is just two LinearLayouts, some text and two buttons called Cancel and OK. The horizontal LinearLayout is nested inside the vertical:
For accuracy the full XML, which you shouldn't need, is:
Now that we have the UI defined as an XML file we can define the OnCreateView. Add a DialogFragment as a new class and edit the onCreateView to read:
You should be used to the idea of inflating the XML layout file to generate the View hierarchy. To make the dialog look more like a dialog all we have to do is set the title:
Notice that the OnCreatView returns the View hierarchy as if it was a standard Fragment. The two buttons - Cancel and OK need to be setup with event handlers:
|
|||||
| Last Updated ( Saturday, 25 July 2015 ) |