| Android Adventures - Fragments and Android Studio XML |
| Written by Mike James | ||||
| Thursday, 22 December 2016 | ||||
Page 1 of 3 Creating and using Fragments is usually a matter of working with XML layouts. Android Studio can help with this task. In this part of Android Adventures we look at how easy working with Fragments can be if you make use of the templates and other facilities provided by Android Studio.
Android Adventures - Mastering Fragments & Dialogs
ContentsThis book is currently being revised. Chapter 5 and later refer to an earlier version of Android Studio - revisit for updates.
If you are interested in creating custom template also see: Custom Projects In Android Studio
Android Studio Generated Fragment UIAndroid Studio is opinionated when it comes to generating a UI. For example, it doesn't give you the simplest of options, the one that might suit a beginner. Instead it uses two layout files one which defines the standard system components present in every UI -
and one that defines the part of the UI that is special to the app
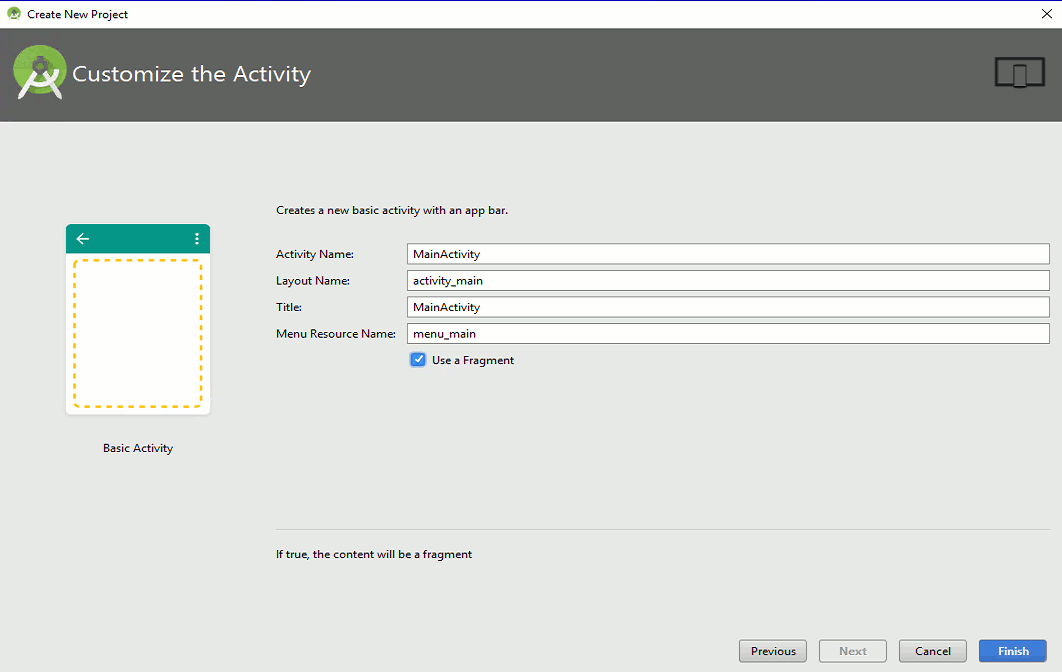
In early versions of Android Studio it even enforced the use of a Fragment in the most basic of UI templates. The current version only provides this as an option, but the intent is that you should use it. The philosophy is that the simplest Android UI might not warrant the use of a Fragment, but simple UIs tend to evolve into something more complex and this does require the use of Fragments. Let's take a look at the project structure that results if you opt to allow Android Studio to create a Fragment-based UI. Start a new project, call it FragUI, use the Basic Activity template and when you get to the final dialog box make sure the Use a Fragment option is selected.
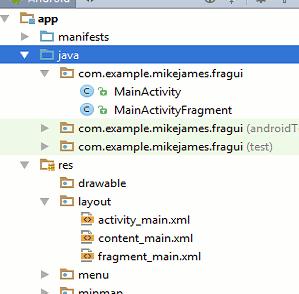
When the project has been generated you will discover that as well as the usual project structure you now have three layout files and two Java files:
The layout files are perhaps the most confusing. Now we have
The content_main xml file is included within the activity_main.xml and this means that this division is purely a matter of using two files to define an xml file where one would do. For example we only inflate activity_main.xml in onCreate. By contrast fragment_main.xml isn't included in either of the other two xml files and in this sense it functions as an independent entity and it isn't just a splitting of a single XML file into to portions. The fragment_main.xml file is inflated by the Fragment and not by the Activity. That is the MainActivityFragment Java file as the code that inflates the XML file and returns the View hierarchy to be used in the UI. It contains the following code:
If you have read Chapter 1 you will recognise the onCreateView method which handles the CreateView event generated by the Activity. This simply inflates the XML file to generate the Fragments View hierarchy and returns it so that the Activity can display it. The first parameter of the call specifies the id of the View object in the UI that the Fragment's UI is to be added to. Notice that it is assumed that the Activity already has created a UI and the Fragments UI is simply going to be added to it. If you are unfamiliar with Android Studio 2.2 the introductory book Android Programming: Starting With An App (I/O Press), based on the previous Android Adventures series is devoted to looking at its use in creating a UI. If you load the fragment_main.xml file into the designer you will find that you can edit it in the usual way and place UI components, just as before, buttons etc, on the design surface. Apart from the need to use a different xml file there is no real difference between creating a UI using the Activity or the Fragment. What this means is that using Android Studio you can create Fragment UIs in exactly the same way that you would construct a UI for an Activity. So far so good, and all of this should be familiar to you, but where is the Fragment actually loaded by the Activity? In other words, where does the Activity invoke and use FragmentManager and add the Fragment to the UI as described in Chapter 1? It does do this, but it is well hidden. If you look at the Activity's onCreate method you will find:
which is exactly what you would find if you weren't using a Fragment. No mention of a FragmentManager here. The key difference is hiding in the content_main.xml file. If you load this and open it in XML mode you will see:
The layout XML has been extended to allow the specification of a Fragment using the <fragment> tag. Now when the inflator encounters the <fragment> tag it processes it by using the FragmentManager. That is, it does something like:
In other words, the inflator takes care of all of the steps in creating the Fragment and in obtaining its View hierarchy and adding it to the Activity's View hierarchy. |
||||
| Last Updated ( Sunday, 26 March 2017 ) |