| Android Programming In Kotlin: Basic Controls |
| Written by Mike James | ||||
| Monday, 23 September 2019 | ||||
Page 2 of 3
There are different types of resource you can select from, and there are resources defined by the project, the Android system and any Themes you might be using. Sometimes you can't see these three categories because they are expanded into long lists:
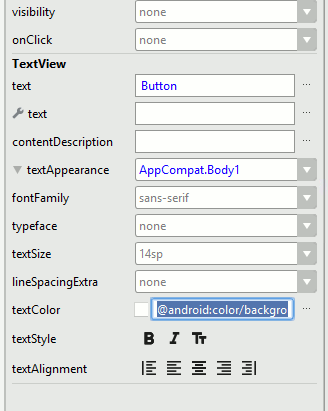
In this case you want to select a color so select the Color tab and then the android list. Scroll down and you will see a set of predefined colors that you can use. Find background_dark and select it: Of course, you now cannot see the text in the Button. To modify its color scroll down in the Attributes window until you can see TextView. The Button is a composite object and it has a TextView object inside of it that displays the Button's text. If you drop down the textAppearance menu you will see textColor. Simply select an alternative light color to use:
If you now place an ImageButton, located lower in the palette in Images, on the design surface, the Resources window opens at once. This is to allow you to select a "drawable", or icon, for the ImageButton to display. Scroll down until you find ic_menu_add. When you select it this becomes the src property for the button: The result is two buttons that look something like:
You can spend a great deal of time exploring ways to make use of a button's attributes to style it just as you want it to look. To attach a click event handler on both buttons you can simply define a function in the Activity and set the onClick property on each button. You can find examples of using buttons this way in earlier chapters. Now that we know how to handle events using lambdas it is worth applying this more sophisticated technique. As we want to assign the same event handler to all three buttons we need to create an instance of OnClickListener using a lambda. All you have to do is enter: val myOnClickListener = { view: View? ->
val b = (view as Button)
b.text = "You Clicked Me"
}
Notice that you now have to supply the type of the parameter as the system cannot infer it. All that remains to be done is to set an instance on each of the buttons: button.setOnClickListener(myOnClickListener) imageButton.setOnClickListener(myOnClickListener) Now when you click on either of the buttons myonClickListener is called. Note that saving the lambda in a variable for reuse isn’t more efficient than copying out the lambda each time it is required – a new instance of onClickListener is created for each Button. Its only advantage is that there is a single function that you need to modify and maintain rather than two. It is also worth noting that, while a button has no function in life other than to be clicked, all of the other controls can also respond to an onClick event. That is you can use anything as a button if you want to. All AttributesIn book only |
||||
| Last Updated ( Monday, 23 September 2019 ) |


