|
Page 1 of 2 Testing JavaScript with QUnit is very easy and it rewards the effort you put in many times over. Find out how easy it is to add some tests to an existing JavaScript program.
Available as a Book:

buy from Amazon
- Understanding jQuery
- Basic jQuery CSS Selectors
Extract: The DOM
- More Selectors
Extract: Basic Selectors
- The JQuery Object
- Filters
- DOM Traversal Filters
- Modifying DOM Objects
Extract: Modifying The DOM
- Creating Objects & Modifying The DOM Hierarchy
- Working With Data
Extract: Data ***NEW!!!
- Forms
- Function Queues
- Animation
- jQuery UI
- jQuery UI Custom Control
- Easy Plugins
- Testing With QUnit
- Epilog A Bonus Function
Also Available:

buy from Amazon
Unit testing can be turned into a complete philosophy of how to create programs, but it doesn't have to be. The basic idea is very simple - just add some code that checks that your JavaScript function does what you think it does and nothing else. If you have tests then not only can your confirm that your code is working now, but that it is working in the future. In other words, you can make changes to your code, or refactor it, and test it to see if you have broken it. As long as all of the tests you have constructed work then you can reasonably assume that the code still does what you want it to.
This sounds sensible but you have enough work writing the code that does useful things without having to write lots of test code as well. This is where QUnit comes in. It makes adding tests easy and quick. What is more as long as you have written your program in a reasonably good style there should be no need to make any changes to it. The tests can all be written in a separate file and run when needed.
That is:
testing with QUnit requires no changes to your production code.
All of the tests can be created in a special testing file and run as and when required - no testing code is added to your production code.
Let's see how easy it is.
A First Test
If you are using QUnit for real then it is worth downloading a local copy but the quickest way to get started is to use a content delivery service.
Create a new HTML file containing:
<!DOCTYPE html>
<html>
<head>
<title>My Tests</title>
  <meta http-equiv="Content-Type"
         content="text/html; charset=UTF-8">
  <link rel="stylesheet" href=
    "http://code.jquery.com/qunit/qunit-2.1.1.css">
  <script src=
     "http://code.jquery.com/qunit/qunit-2.1.1.js">
  </script>
</head>
<body>
<div id="qunit"></div>
</body>
</html>
This is a minimal testing web page. Of course you need to change the version numbers to the latest version if you want to but the examples work with the version indicated.
You need to load the QUnit CSS file:
"http://code.jquery.com/qunit/qunit-2.1.1.css"
and the QUnit JavaScript:
"http://code.jquery.com/qunit/qunit-2.1.1.js"
You can just as easily download both files and serve them locally.
The only other detail you need is a div with the id qunit i.e.
<div id="qunit"></div>
This is the element that the QUnit code uses to display its results. You can use a more complicated page layouts but this is the least you can get away with and it will serve us for the rest of the article.
To show how testing works we need something to test.
So imagine that we have a very big JavaScript program stored in a local file MyJavaScript.js. It is assumed that this contains all of the code you want to test. If you have more files then you simple treat them in the same way as MyJavaScript and load them all into the testing page.
Of course you might ask what about inline code - that is code embedded in an HTML page? This should be at a minimum and it is best practice to separate the HTML and the JavaScript into different files. If you haven't followed this rule then you can't test your JavaScript. This in iself is a very good reason for spending time unthreading your JavaScript from the HTML and putting it in a separate file.
From here on we assume that all of the code to be tested is in MyJavaScript.js.
Of course we actually need to put something in the file to test and in this case we will start with the single function:
function myMax(a,b){
    return Math.max(a,b);
}
which is very simple and unlikely to surprise us in its behavior. It returns the maximum of two numeric values.
You need to imagine that MyJavaScript.js is packed with lots of objects and functions that our tiny function is standing in for.
To test the code in MyJavaScript.js it has to be loaded into our testing file. So we need to add:
<script src="/MyJavaScript.js"></script>
to the head section of the testing page.
Now we are ready to write our first test.
At its simplest a test is a single assertion of what we expect the output of the function to be. Any testing package has a number of different types of assertion to suit the sort of thing that the function returns. The simplest in QUnit is ok which passes if the first argument is truthy - i.e. considered true according to JavaScript's type juggling.
So for example we can assert that the maximum of 1 and 2 is 2 using
assert.ok(myMax(1, 2) == 2);
This is a very simple test but you can see that if myMax doesn't return 2 then there is something seriously wrong.
We have our first assertion and now we have to run the test based on it. QUnit allows you to group a set of assertions together into a complete test. All you have to do is make use of the test function:
QUnit.test("MyTest", function (assert) {
 assert.ok(myMax(1, 2) == 2);
 });
The first argument is the name of the set of tests and the second is a function that invokes each of the assertions.
That is a test is a set of assertions and your testing page will consist of a number of tests each with its own list of assertions and other code.
You can place this code anywhere convenient - in the body of the test page if you want to give it center stage. Of course if you are keeping the HTML and the code separate then it should be in a separate file. For the sake of simplicity in this example the code will be placed in the body of the web page.
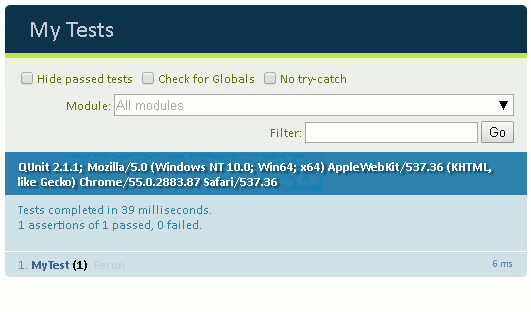
Now when you load the page you will see that QUnit has formatted and presented you with the results of your test:

You can see that it gives you details of the browser that the page was opened in and the name of the group of tests. What you see other than this depends on what happened when the tests where run. In this case all of the tests passed and so we just see a summary of the situation. - 1 assertion, 1 passed and 0 failed.
When Things Go Wrong
This is more or less all there is too it but we need to find out a little more about the types of assertions we can make and what happens when things go wrong.
We can easily demonstrate what happens when a test fails.
Simply change the test function to read:
QUnit.test("MyTest", function (assert) {  assert.ok(myMax(1, 2) == 2, "Simple Test");  assert.ok(myMax(-1, -2) == 2, "Not Max Abs");
});
Notice that now the second test is a fail because the maximum of -1 and -2 is -1 not -2 or 2.The test is checking that the myMax function is performing an absolute maximum not a signed maximum.
We have also added a second argument to the ok function calls. This is a string which is displayed along side the assertion to give you an idea what the defective test was all about.
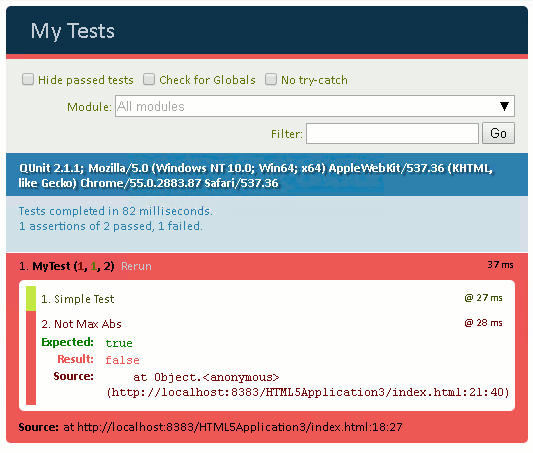
If you refresh the page the tests are run again and you will see:

Now we have 2 assertions of which only 1 passes and you can see the descriptions alongside each one.
If the number of assertions gets too big you can click the "Hide passed tests" check box and you will only see the troublesome ones.

|


