| Offline C/C++ Development With The Micro:bit |
| Written by Harry Fairhead | ||||||
| Friday, 19 February 2016 | ||||||
Page 2 of 2
Adding a dependency on the microbit libraryYou could start populating the source folder with whatever program you wanted to write, but an micro:bit program has a dependency on the microbit library which needs to be added. How this is done is slightly different from installing a standard mbed dependency. At the moment the microbit library isn't hosted by mbed and so you have to download it from its github repository. However, before we can add any dependencies we have to set the target for the project. In principle you only have to do this once for any yotta session, but in practice you might find that it gets forgotten or overwritten. For the micro:bit you set the target using:
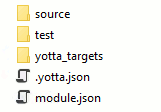
This adds a yotta_targets directory with some files that are needed for the target.
After this you can add the dependency to the microbit library:
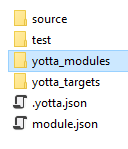
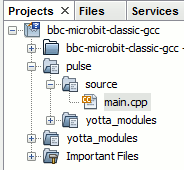
This might take a few minutes because the library is downloaded from GitHub. After it is complete you will see a module folder has been added to the project:
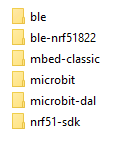
This contains the code for the libraries you might want to use in your programs:
At this point you can build the project. If you plan to stay with yotta and use a simple editor to create your C/C++ files then this is how you will build your application each time. If you plan to move to an IDE such as NetBeans then the IDE will make use of the ninja files created to build your program in the future. So we just need to use yotta to build the project. The problem is that there are no files in the source or test folders and yotta will simply ignore any empty folders in the build. To give the system something to build we need to add a .cpp file in the source folder. Use any editor to add something trivial like:
and store the result as main.cpp or any name you care to use. Now we can build and test the program using:
If you watch what happens you will see the program build and it will tell you that the build files have been written to the build/bbc-microbit-classic-gcc directory int he project. The important part is that you will find the hex file in the directory:
The file that you need to download to the micro:bit is pulse-combined.hex and not the pulse.hex file. If you can't find a .hex file then check the messages produced by yotta and you will probably find that srec_cat.exe is mentioned as missing. See the instructions given earlier about obtaining and installing srecord. You should be able to see the "NEW PROGRAM" message scroll past. This is all you need to do. You can now edit and add .cpp files to the source directory. If you need to add other dependencies then use the install command. Each time you use the build command new cmake and ninja files are generated so you can keep things up-to-date but also note that there is no point in editing any of the cmake or ninja files. To summarise: To create a project first create a new folder and make it the current directory. To create the project folders and basic files use:
To target a project for the micro:bit use:
To install the essential dependencies to run your new project use:
To install any other dependencies use the same command but change the name of the module or GitHub project you want to include. Add at least one .cpp file to the source folder and to the test folder if you want to construct tests. To build the project use:
The hex file you need to download will be found in
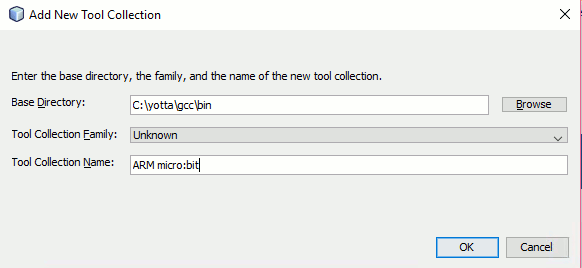
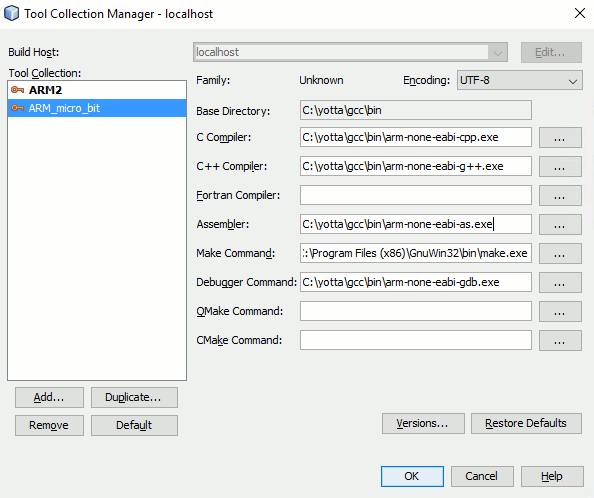
and it will be called project-folder-combined.hex Using NetBeansWhile you can use the yotta route to building your programs, it is fairly easy to use an IDE such as NetBeans or Eclipse to make your job easier. The description here is for NetBeans, but getting Eclipse to work follows the same route. It is assumed that you have yotta installed and working and have built a micro:bit program using yotta. You do not have to run it, just build it, unless you want to check that everything is working. It is also assumed that you have NetBeans for C/C++ projects installed and working. You need to add the yotta directory to the path so that it can be found automatically by the build process. In the case of Windows add c:\yotta to the existing path. Install Make If you are working with Windows you also need to download and install a version of make that works under Windows. You can get this by installing cygwin or mwin but the simplest way is to download GNU make for Windows from: http://gnuwin32.sourceforge.net/packages/make.htm Simply install it using the setup program and the default settings. Set up Tool Collection Your first task in configuring NetBeans is to set up the tool collection. The ARM cross compilers that you need should be already set up as part of the yotta installation. To specify where they are you need to run NetBeans and use the command Tools,Servers. If this is a new installation of NetBeans and you haven't created any C++ projects yet then the Server window might take some time to list C/C++ Build Hosts - wait for a few minutes. Navigate down to C/C++ Build Hosts and expand the localhost node. Right click on ToolCollections under localhost and select add New Tool Collection. In the dialog box that appears set the base directory to:
This is where the compilers are stored, but NetBeans probably won't recognize them. We could create a new tool set definition but it is easier just to ignore the warning and press on. To unlock the dialog you need to select one of the other compiler set types, say cygwin, and then set it back to unknown and you will find you can enter a name for the tool set.
You now have to fill in the details of where to find the compilers etc manually as NetBeans didn'ta automatically locate them:
Not all of these are required and you might have to change the directories depending on where things were installed.
The final step is to make sure that c:\yotta is in the path. To do this right click on This PC, select properties and select Advanced system settings. In the dialog box that appears click the Environment Variables button and edit Path in the System Variables list. Add c:\yotta; to the start. Note: there are other yotta directories already in the path but you will still need to add c:\yotta.
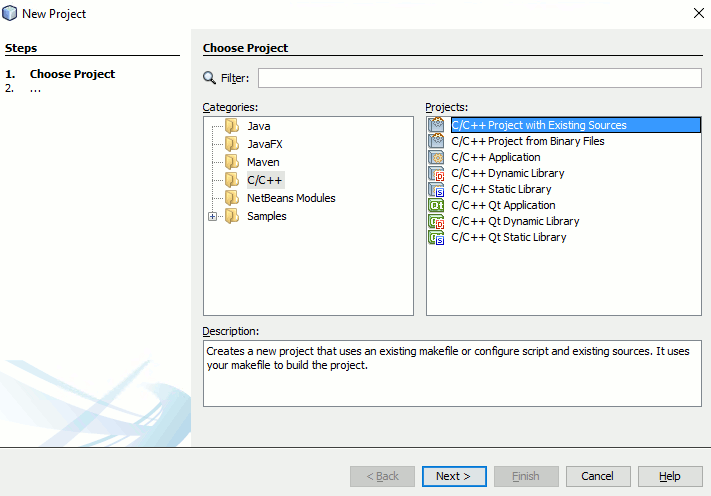
Import the Project With the tool collection specified we can now import the project we created using yotta. Simply use the command File,New Project and select Project With Existing Sources:
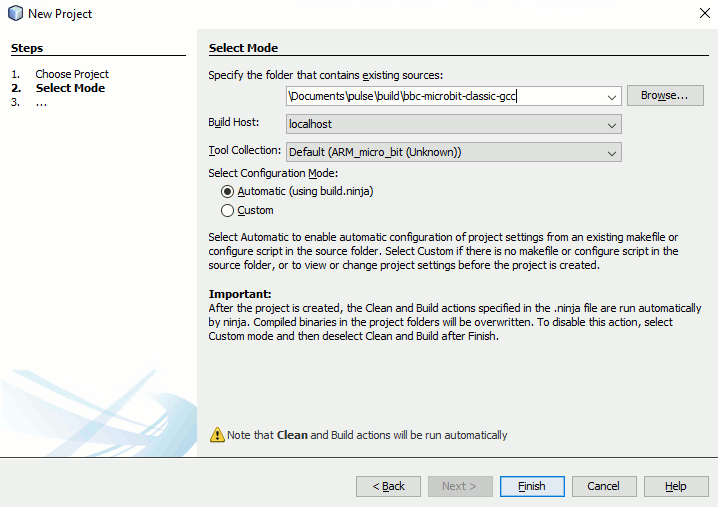
Finally navigate to the project directory and import the project:
It takes time for the project to import, but when it has you can try to build it. In many cases you will see the message: ninja: no work to do. because all of the files are up-to-date following the clean rebuild NetBeans has just performed. To give it a good test you need to edit the C++ source file and then rebuild. Alternatively you could try another full clean build but this will recompile the library so it is slow.
If you get an error message to the effect that ninja.exe cannot be found then you are missing c:\yotta in the path and you need to add it - see earlier. If you change the path variable you will need to restart NetBeans for it to have any effect. You can now edit the source file and add files to the project and in most cases the build will compile the changes. Notice that you cannot use the Run command as NetBeans has no idea how to run the file that it compiles. You need to use the Build or Clean Build commands - the "hammer" icons next to the green run icon.
You will find the hex file that has to be downloaded to the micro:bit in the usual directory
and it will be called project-folder-combined.hex So in this case the directory is
and the file will be called pulse-combined.hex If you need to add another dependency or make structural changes to the project then you need to return to using yotta to modify things. You usually have to build the project using yotta once before NetBeans notices the difference. The reason for this is that the changes are only put into the ninja files as part of a yotta build and NetBeans uses these to build your project. The fact of the matter is that yotta is in charge of the project and NetBeans follows what it says. From here you can explore other configurations and even automatic running of the project and debugging.
More Informationdeveloper.mbed.org http://lancaster-university.github.io/microbit-docs/ Related ArticlesGetting Started With C/C++ On The Micro:bit The BBC Micro:bit Is An Mbed Device In C/C++ Commando Jump Game For The Micro:bit In Python
To be informed about new articles on I Programmer, sign up for our weekly newsletter, subscribe to the RSS feed and follow us on, Twitter, Facebook, Google+ or Linkedin.
Comments
or email your comment to: comments@i-programmer.info
|
||||||
| Last Updated ( Sunday, 10 July 2016 ) |
