| Getting Started with NetAdvantage Ignite UI jQuery Controls |
| Written by Ian Elliot | ||||
| Wednesday, 03 July 2013 | ||||
Page 1 of 3 jQuery is a great library, but jQuery UI is a bit underpopulated for many applications. The Ignite UI is a professional set of UI controls fully integrated with jQuery and compatible with jQuery UI.
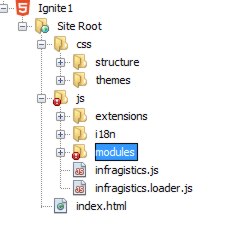
Infragistics' IgniteUI provides a jQuery compatible UI and while it comes with ASP.NET MVC helper functions it can be used very easily from almost any server side technology. The reason for this is, of course, that it is a pure JavaScript clientside implementation. Let's take a look at how this works and how it all fits in with jQuery. Getting startedAll you have to do to start developing client side UIs is to download the trial version of IgniteUI from the Product Downloads page of the Infragistics website. Once you have the zip file, run the installer which you will currently find in the root directory of the zip. The installer that you need to follow the instructions in this article is NetAdvantage_Ultimate_20122, but you might also want to install the samples that you will find in the same directory. Once the installer is finished you will discover an Infragistics item in the start menu. This is handy to gain access to the documentation and forums; however for the real work, you need to navigate to: C:\Program Files (x86)\Infragistics\IgniteUI 2012.2 where you will find the JavaScript libraries and the MVC helper classes. There are many ways to work with HTML/JavaScript and they are all equally good. To make things concrete I selected the current version of NetBeans which is free to download and very easy to use to construct HTML apps. Project StructureTo try out IgniteUI simply start a new HTML project. The only really tricky bit in using jQuery and IgniteUI is getting correct JavaScript files available in the correct place. As with the main jQuery libraries, you can either opt to host the files yourself of use a Content Delivery Network CDN for all of the libraries. Infragistics has set up a CDN for IgniteUI and Google offers one for the main jQuery files. For a production application using a CDN has lots of advantages, but to simply try things out it is safer in terms of making sure things work to actually place at least some of the files you need in local directories. To get started, simply drag the js directory to the Site-Root - this contains all of the JavaScript files you will need. Also drag the css directory to the Site-Root - this has all of the style sheets you will need. This is slight over-kill in that you don't need all of these files to make any particular project function but when you are just getting started this is the easy option - you can worry about trimming things down later. After copying the folders the project structure should look something like:
Now we are ready to start building our first example page. If you are wondering where the main jQuery libraries are, we will download them from the Google CDN. If you want to you can download them into the script directory but using a CDN is simpler in this case. It is also worth noting that Ignite UI makes use of HTML5 but all you need to include to make it work on older browsers is a copy of Modenizr (a free download of course). A first controlCreate a new HTML file called currency. The first thing we need to do is load the script libraries. First the two jQuery libraries:
and finally the Ignite UI library:
If you have stored any of the JavaScript files anywhere else then simply change the paths. The process of using jQuery controls is fairly standard. First you need a suitable "dummy" html control in the web page that can be used by the JavaScript to create a "decorated" control which does the intended job. For a first example we are going to use a very simple control - the Currency Editor. The html control that will form the basis of the enhanced control is a simple input box:
The value is optional but it gives us something to see when the page is first loaded. Note the id specified - which is used to connect the jQuery component to it. Next we need to run the JavaScript code when the page is fully loaded. To do this we might as well take advantage of the jQuery ready event which with run a function when the document is fully loaded:
All we have to do next is use jQuery to find the input box and then call the igCurrencyEditor method with appropriate parameters to augment it to a full Currency Editor object:
Finally we have to remember to tidy up the function call with a closing
The complete web page is:
When you launch the page, right click on the file and select launch in browser, you will see the Currency Editor complete with the initial value property formatted.
That's about all there is to it. You can now specify other parameters in the call to the method that augments the basic html control You can look up the possible parameters in the documentation for each control and in most cases it is fairly obvious what they are for. |
||||
| Last Updated ( Tuesday, 08 September 2020 ) |