| Introduction to Android 2 application development |
| Written by Sing Li | |||||||||||||||||||||||||
| Wednesday, 25 August 2010 | |||||||||||||||||||||||||
Page 4 of 6

Ensuring Compatible Android Platform VersionsAlso of interest in the AndroidManifest.xml configuration file is the line: <uses-sdk android:minSdkVersion="7" /> This line tells the Android application loader the minimal Android platform that the phone must have before it can run your App. Even though it might be new to us, Android OS has actually been around for a number of years now. There are many devices in the market with older platform versions. With each new platform version and update, bugs are fixed, and new features are introduced. Some newer features require additional support hardware such as higher frequency CPU, GPS, proximity sensors, and so on. By specifying the minimum SDK version required, one can eliminate the chance that the user will have the unpleasant experience of seeing your App crash or lockup when required APIs/features are not available. Table 1 shows the SDK version number and its associated Android Platform release/update. Table 1
This article is developed against SDK version 7, or Android Eclair release 2.1 update 1 – the platform of my current phone. Designing Android Application Graphical User Interfaces (GUI)The user interface for an Android app can be created using one of two techniques:
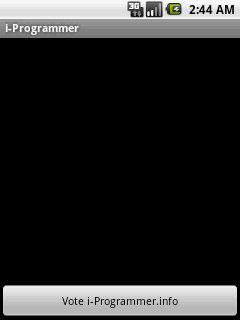
By far, the second declarative approach is preferred whenever possible. One obvious advantage is the relatively ease to make minor changes to the user interface without modifying the Java code. Don't think for a moment, though, that the XML configuration language is some sort of HTML; it is not. Instead, it is an Android UI specific set of XML tags that can be used to parameterize and link together Java based user interface widgets. Each widget in the UI is a View (actually a subclass of the android.view.View class), and each set of widgets comprising a user interface is a typically a tree of View. This is how the i-Programmer App's user interface is created, check out the res/layout/main.xml file (shown in Listing 3). Listing 3<?xml version="1.0" encoding="utf-8"?> This configuration file configures the user interface shown in Figure 7.
Figure 7 Basically, the UI consists of a Linear Layout component containing a TextView widget and a Button widget as its child. A Linear Layout places its children one after another in the order they are specified. Both of the children in this case are configured with android:layout_width="fill_parent" attributes, which means they expand to the width of the parent Linear Layout. The default weight of a widget is 0, and since the Textview is marked with android:layout_weight="1", it is the widget that expands to fill all available space. Once you understand that your application is basically a set of hooks and configuration XML scripts, you are on ready to explore the seemingly bewildering array of Android documentation.
<ASIN:0321743016> <ASIN:0789746336> <ASIN:0321741234> <ASIN:0321673352> <ASIN:1430232439> <ASIN:1935182722> |
|||||||||||||||||||||||||
| Last Updated ( Sunday, 19 September 2010 ) |